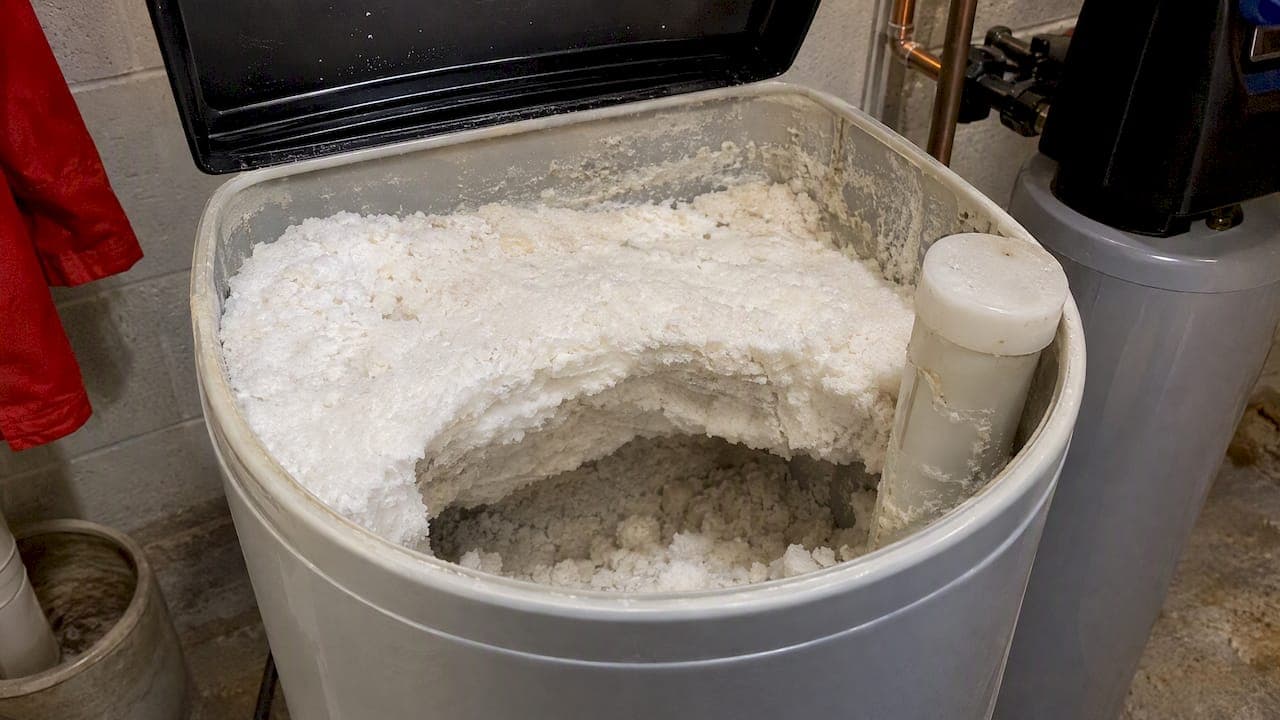
A salt bridge is a hardened crust of salt in your softener's brine tank that stops the rest of the salt from dissolving, which means your system cannot draw brine and your water will not soften. If you notice hard water symptoms, check the brine tank first. Stop adding salt, look for a crust, and break it yourself if you feel comfortable, or call a plumber if you do not.
TL;DR:
- A firm crust above a hollow space, unchanged salt levels for weeks, and pooled water distinguish a bridge; test gently with a wooden stick.
- Break the crust gently with a wooden stick, soften resistant salt with hot tap water, and run a manual regeneration cycle after clearing it.
- Avoid metal tools and boiling water, which can crack or warp plastic tanks; protect nearby flooring with towels before disturbing salty water.
- Check salt every 4 to 6 weeks, keep the tank about half full and above one quarter, and use sodium or potassium softener pellets.
- If hardness persists after regeneration, check for a remaining crust; recurring bridges, tank damage, or unresolved symptoms call for a plumber, not repeated DIY attempts.
Table of Contents
- Quick signs and checklist to confirm a salt bridge
- Step-by-step removal methods, from gentle to more involved
- Tools, materials, and safety precautions for DIY removal
- Preventing salt bridges: correct salt, tank fill level, and routine checks
- When to call a professional plumber and what to expect
- Post-fix verification: regenerating, testing, and monitoring
- Troubleshooting persistent or related faults
- Practical tips from our plumbing team
- How we can help with salt bridges and softener upkeep
- FAQ
- Sources
Quick signs and checklist to confirm a salt bridge
Before you grab a tool, confirm the problem is actually a salt bridge. The symptoms show up in two places: your water and your brine tank.
Around the house, you will usually notice soap that will not lather, spots or film on dishes and glassware, and a change in how your water tastes or feels. In the brine tank, the telltale signs are more specific:
- Salt level in the tank has not dropped in several weeks, even though the softener keeps running its cycles.
- A hard, crusty layer sits above a hollow space, instead of loose salt resting on water.
- Water pools at the bottom of the tank with no salt dissolving into it.
- Tapping the top layer feels solid instead of grainy.
To test it safely, take a broom handle or a similarly long wooden stick and gently press down near the center of the salt pile. Loose salt gives way easily. A bridge feels firm, almost like pressing on a shelf. Comparing your current salt level to what you recorded a few weeks ago is one of the fastest ways to confirm the problem, since steady salt levels over time almost always point to bridging.
Pro Tip: Keep a small note on your phone or a calendar reminder of your salt level each month. That simple habit makes a bridge obvious within weeks instead of months.
Step-by-step removal methods, from gentle to more involved
Once you have confirmed a bridge, work through these methods in order. Start gentle, and only move to a more involved method if the first one does not clear it.
Before touching the tank, check your owner's manual for any bypass valve or shutoff steps specific to your model, and switch the unit to bypass mode if it has one. This protects the resin tank from unnecessary cycling while you work.
- Method A: Gentle breaking. Insert a broom handle or wooden stick near the tank wall and push down carefully, working your way around the rim toward the center. The goal is to crack the crust into pieces, not to force it through in one spot.
- Method B: Hot water softening. If the crust does not break easily, pour several quarts of hot (not boiling) water over the surface and let it sit until the salt has softened. Boiling water can warp some plastic tanks, so stick with hot tap water. Once the salt has softened, repeat the broom handle method.
- Method C: Partial emptying and vacuuming. For a stubborn or thick bridge, scoop out loose salt down near the crust, break the remaining crust by hand or with your stick, then use a wet/dry shop vac to remove leftover brine and debris from the bottom of the tank. This method is best saved for bridges that have been building for months or that cover the entire tank.
After clearing a bridge with any of these methods, run a manual regeneration cycle. This flushes the system, re-establishes proper brine draw, and gives you an early read on whether the fix worked. EPA guidance specifically recommends breaking a bridge with a broom handle or hot water, then running a regeneration cycle right after.
- Work slowly during Method A to avoid cracking the tank wall.
- Never force a tool straight down through thick salt; angle it and work the edges first.
- Stop and switch to Method C if a bridge resists both Method A and Method B.
Tools, materials, and safety precautions for DIY removal
Having the right tools on hand makes this job faster and safer. Gather these before you start:
- A long wooden broom handle or similar stick (no metal bars or chisels)
- A rubber mallet, for tapping rather than striking
- A bucket for scooped salt and a wet/dry shop vac for brine residue
- Rubber gloves and eye protection
- Old towels to protect flooring around the tank
Avoid metal bars, screwdrivers, or chisels, since these can puncture or crack the plastic brine tank. Avoid striking the tank wall directly for the same reason. Never substitute rock salt, table salt, or road salt for proper softener pellets, since impurities in those products contribute to bridging and clogging in the first place.
Before you begin, know where your bypass valve is and isolate the unit if your model calls for it. Salty water can damage flooring and finishes, so lay towels around the base of the tank and have your bucket ready before you start breaking up the crust.
Pro Tip: A rubber mallet tapped against a wooden stick, rather than directly against the tank, gives you extra force without risking a crack in the plastic.

Preventing salt bridges: correct salt, tank fill level, and routine checks
Salt bridges can be related to the type of salt, the amount in the tank, or how often it is checked.
Use sodium or potassium chloride pellets made specifically for water softeners, and skip rock salt, block salt, or table salt. NSF/ANSI 44 sets material and performance standards for residential softeners and specifically flags salt quality as a factor, noting that rock or block salts introduce impurities that contribute to bridging and tank buildup.
EPA guidance recommends checking salt levels every 4 to 6 weeks and keeping the brine tank filled to about half capacity, never letting it drop below one quarter full, according to EPA's guide on selecting and maintaining a water-efficient softener. That interval gives you enough time to spot a slow-forming bridge before it fully seals off brine access.
A few habits make a real difference over the life of your system:
- Fill the tank about halfway; avoid topping it off to the brim.
- Store bulk salt bags in a dry area, since humidity speeds up bridging.
- Choose a demand-initiated regeneration system where possible, since it cycles only when needed rather than on a fixed timer.
- After clearing any bridge, watch your salt usage for the next several weeks to confirm it is dissolving normally.
If you are shopping for a new system or resizing an old one, our water softener sizing guide walks through how tank size and regeneration frequency work together, which also affects how often bridging tends to occur.
When to call a professional plumber and what to expect
Some situations call for a plumber instead of another round of DIY. Reach out when you notice any of the following:
- Visible cracks, warping, or damage to the brine tank or its fittings
- A bridge that keeps reforming within days of clearing it
- Soft water hasn't returned even after you've cleared the crust and run a regeneration cycle
- Uncertainty about your model's bypass valve or control settings
A professional visit for a softener issue may include inspecting the system and addressing the cause of the problem.
We handle water softening and filtration repair and maintenance, so if a bridge keeps coming back or DIY feels too risky for your setup, professional help is available rather than guesswork.
Post-fix verification: regenerating, testing, and monitoring
Clearing the crust is only half the job. Confirming the fix holds up takes a few more steps over the following weeks.
- Start a manual regeneration cycle right after clearing the bridge; check your manufacturer's manual for the exact button sequence or dial setting for your model.
- Test water hardness at a tap farthest from the softener using hardness test strips or a home test kit, and compare the reading to your water's known hardness level.
- Watch the brine tank over the next regeneration cycle to confirm water is being drawn down normally rather than sitting unused.
- Track your salt level over the next 4 to 6 weeks; a steady, gradual drop confirms the bridge is gone.
If softness has not returned after one regeneration cycle, check the tank again for a partial bridge you may have missed, since a thin remaining crust can still block brine formation even after the bulk of it is cleared.
Troubleshooting persistent or related faults
Not every softening failure is a salt bridge. A few related issues produce similar symptoms but need different fixes.
- Salt mushing looks like a thick paste rather than a hard crust and usually comes from potassium pellets breaking down in humid conditions; stirring and a full brine tank cleanout often solve it where a broom handle alone will not.
- A clogged injector or brine line can mimic bridging symptoms even with a clear brine tank; a hot water flush and gentle vacuuming around the injector often clears minor clogs, while persistent clogs usually need a professional flush.
- Control valve or timer issues show up as a softener that never seems to regenerate on schedule; check that the clock and regeneration settings match your manual before assuming the salt itself is the problem.
Practical tips from our plumbing team
A salt bridge looks intimidating the first time you see it, but many homeowners can clear it with a broom handle and a little patience. The mistake we see most often is reaching for rock salt because it is cheaper, or packing the tank completely full thinking that means fewer refills. Both habits make bridging more likely, not less.
Before you start any DIY work, snap a quick photo of the tank and jot down your salt brand and current level. That small step makes it easy to track whether your fix is holding over the following weeks, and it gives us useful context if you ever need a visit.
— JOHN
How we can help with salt bridges and softener upkeep
If a bridge keeps coming back, or you would rather leave the brine tank cleanout, injector clearing, and regeneration check to someone else, we handle the full job.

- Full brine-tank inspection and safe salt bridge removal
- Brine-well and injector clearing for softeners that still aren't softening after a DIY fix
- Manual regeneration and hardness testing to confirm the system is working
- Emergency plumbing availability alongside routine water softening and filtration repair
Our licensed technicians handle the parts of this job that carry the most risk for a DIY attempt, from a cracked tank to a control valve that will not reset. Book a visit with our Bullhead City team and skip the guesswork.
FAQ
Why is my water softener salt hard?
Salt turns hard when humidity in the brine tank causes the top layer to dissolve slightly and then re-harden into a crust, a process called bridging. Using the wrong salt type, such as rock or block salt, or letting the tank sit too full for too long, speeds this up.
Should I add water to my water softener salt tank?
You generally should not add water to the brine tank yourself, since most modern softeners manage water level automatically during regeneration. If water is pooling with no salt dissolving, that usually signals a salt bridge rather than a water shortage.
What salt to buy for a water softener system?
Choose sodium or potassium chloride pellets made specifically for water softeners rather than rock salt, block salt, or table salt, which introduce impurities that speed up bridging, according to NSF/ANSI 44 standards for residential softeners. Pellet form dissolves more evenly than crystal or block forms.
Can you drink water from a salt water softener system?
Softened water is generally safe to drink, but the process adds some sodium to your water, which EPA's drinking water advisory notes can matter for people managing sodium intake for health reasons. If you have a sodium-sensitive condition, check with your doctor or consider a separate unsoftened tap for drinking and cooking.
Sources
- NSF/ANSI 44 Technical Requirements | NSF
- Soften Water Without Wasting It: Guide to Selecting and Maintaining a Water-Efficient Water Softener