If your cast iron drain is rusted, cracked, or backing up again and again, replacement is usually the safer long-term move than another patch repair. The three standard fixes are a sectional PVC swap, full open replacement, or trenchless CIPP lining. Pipes older than 50 years, visible flaking or scaling, or repeat clogs in the same spot all point toward replacement rather than repair. Your first move should be a sewer-camera inspection or a call to a licensed plumber, since accessible sectional jobs often run $375 to $900 while full or under-slab work climbs into the thousands.
TL;DR:
- Replacement is the safest long-term solution when cast iron pipes are rusted, cracked, or repeatedly clog, especially if over 50 years old or showing visible deterioration.
- DIY repairs are limited to small, accessible sections, while under-slab or main stack replacements always require a licensed plumber due to complexity and risk.
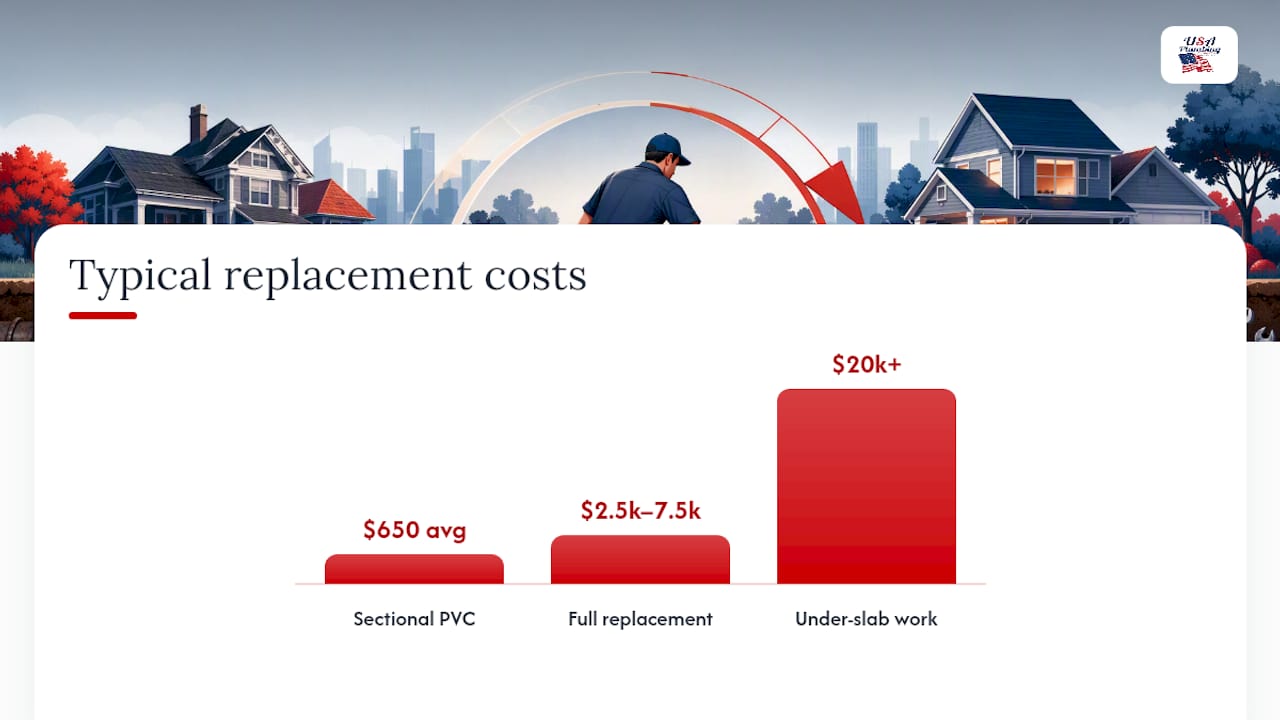
- A 30-foot sectional PVC swap averages about $650, whereas full main stack replacement can cost up to $7,500, with under-slab work exceeding $20,000 depending on access and restoration.
- A camera inspection before repair helps locate the damage accurately and determine if trenchless lining is suitable, saving costs and preventing unnecessary excavation.
- Municipal permits, asbestos testing (if built before 1980), and proper disposal procedures are essential steps often overlooked but necessary for compliance and safety.
Table of Contents
- DIY Vs Hire: A Practical Decision Guide
- Sectional PVC, Full Replacement, or Trenchless Lining?
- How Do You Replace a Cast Iron Section With PVC?
- What Does Cast Iron Drain Replacement Cost?
- Permits, Inspections, and Disposal Rules You Shouldn't Skip
- A Working Plumber's Checklist for Vetting Contractors
- A Recent Job: Diagnosing and Fixing a Failing Stack
- Ready to Book a Cast Iron Drain Inspection or Replacement?
- Sources
- FAQ
DIY Vs Hire: A Practical Decision Guide
A confident homeowner with the right tools can handle some cast iron repairs. A single accessible horizontal run, a lone sink trap replacement, or a short section behind an open basement wall are all fair game for a weekend project. Anything involving the main stack, under-slab piping, or structural support of the building's plumbing skeleton belongs to a licensed plumber, no exceptions worth risking.
The gap between those two categories comes down to access and consequence. A mistake on an exposed basement pipe means a redo. A mistake on an under-slab line means jackhammering concrete, and a mistake on a main stack can mean water damage through multiple floors.
What you need for a DIY sectional job:
- A reciprocating saw with metal-cutting blades, or a snap cutter for a cleaner cut on cast iron
- Shielded rubber transition couplings (commonly known as Fernco or no-hub couplings) with stainless steel clamp bands
- A torque wrench or nut driver rated for clamp specifications
- Riser clamps to support the stack above your cut
- Respirator, safety goggles, and heavy gloves
- Two to four hours for a single accessible section, longer if the pipe fights back
Watch for red flags that mean you should stop and call a professional immediately. Visible sagging or bellying in a horizontal run suggests the pipe has already lost structural integrity. Soil that looks or smells contaminated near an exterior dig means a leak has been happening longer than you think. If your home was built before 1980 and the joints are packed with a fibrous material, treat it as a possible asbestos hazard and get it tested before you touch it. And if the job requires disturbing a slab or exterior excavation, most municipalities require a permit, which usually means the work needs to be documented and often inspected by someone licensed.
Sectional PVC, Full Replacement, or Trenchless Lining?
Choosing a method comes down to where the damage sits, how much of the run is affected, and how much disruption you can tolerate.
Sectional PVC replacement fits localized problems: a cracked joint, a corroded elbow, or a short run with pinhole leaks. You cut out the bad section and splice in Schedule 40 PVC using shielded couplings. It's fast, cheap relative to the alternatives, and doesn't require touching the rest of the system.
Full open replacement makes sense when corrosion has spread across most of a run or an entire stack. Contractors remove the whole cast iron line and replace it with PVC or another modern material. It's more invasive, often involves demo and restoration, but resets the entire line to a fresh service life.
Trenchless CIPP (cured-in-place pipe) lining avoids excavation by inserting a resin-saturated liner that hardens into a new pipe within the old one. It's often a single-day process, which makes it appealing when you want to protect landscaping or avoid tearing into a slab.
Cost snapshot: An accessible 30-foot sectional swap averages about $650, with a typical range of $375 to $900. Full main stack replacement runs $2,500 to $7,500, and under-slab work can climb past $20,000 depending on access and restoration needs.
Trenchless lining has real limits. The host pipe needs enough remaining structure to support a liner. Before lining goes in, the pipe must be thoroughly cleaned and descaled; leftover scale or pustules can stop the resin from bonding properly or shrink the interior diameter enough to hurt flow. Lining also isn't a good fit for a pipe that has already collapsed or lost its round shape.
Here's how the three stack up side by side:
- Sectional PVC: Lowest cost, fastest for localized damage, limited to accessible sections
- Full replacement: Higher cost and more disruption, but resets the entire line's service life
- CIPP lining: No excavation, often done in a day, but requires a structurally sound host pipe and pre-cleaning
Cast iron itself isn't a bad material. It's quiet under flow and can last decades, but it corrodes from the inside out as sulfates and bacteria eat away at the pipe wall over time. Modern PVC trades some of that quietness for corrosion resistance and a longer realistic service life.
How Do You Replace a Cast Iron Section With PVC?
This is the job most homeowners actually attempt: cutting out a failed section of horizontal cast iron and splicing in PVC. Here's how a competent job goes from start to finish.
Before you cut anything:
- Shut off the water supply to fixtures feeding that line, and if the section is on a vertical stack, install riser clamps above your cut point anchored to framing. A heavy upper stack can collapse once you remove a load-bearing section below it, so this step isn't optional.
- Suit up in a respirator, goggles, and gloves. If the joints are packed with a fibrous material and the home predates 1980, stop and get it tested for asbestos before proceeding.
- Plan your disposal. Cast iron is heavy and most municipal trash pickup won't take it, so line up a scrap metal recycler or a dedicated hauling service in advance.
Tools and materials checklist:
- Reciprocating saw with metal-cutting blades, or a snap cutter for a cleaner, faster cut
- Schedule 40 PVC pipe sized to match the existing line
- Shielded rubber transition couplings (Fernco or no-hub style) with stainless steel clamp bands
- PVC primer and cement for any PVC-to-PVC joints
- A torque driver for tightening clamp bands to spec
- Tape measure, marker, and a level for checking slope
The cutting and installation process:
- Mark your cut lines on either end of the damaged section, leaving a little extra room for the coupling's center stop.
- Cut through the cast iron with your saw or snap cutter, working slowly to avoid binding the blade.
- Remove the damaged section and clean the cut edges of rust and burrs.
- Measure the gap and cut your PVC replacement piece to length, accounting for how far each coupling will slide onto the pipe ends.
- Slide the shielded couplings onto the cast iron stubs first, then position the PVC piece between them.
- Tighten the stainless steel clamp bands to the torque specified by the coupling manufacturer. Under-torquing is one of the most common failure points in this kind of repair, so don't eyeball it.
- Check your slope with a level. Horizontal drain lines need roughly 1/4 inch of fall per foot to keep waste moving without letting liquid outrun solids.
- Run water through the line and watch every joint for leaks before you close up any walls or flooring.
Never glue or thread PVC directly onto cast iron. The two materials expand at different rates under temperature swings, and a rigid joint between them will eventually crack or separate. Shielded couplings absorb that movement.
Pro Tip: Buy your transition couplings first and bring the exact model number to the hardware store when you pick out clamp bands. Mismatched bands are a small mistake that causes a surprising number of repeat leaks.
Once the water test passes, patch any opened wall or floor sections, dispose of the cast iron responsibly, and log the repair with a photo for your records. If at any point you hit a joint you can't budge, a section that's crumbling instead of cutting cleanly, or a slope you can't achieve because of surrounding structure, stop and call a plumber rather than forcing a fix that won't hold.
What Does Cast Iron Drain Replacement Cost?
Price depends heavily on how much of the pipe is accessible without demolition. A homeowner-accessible sectional swap, the kind covered in the how-to above, averages about $650 for a 30-foot run, typically landing between $375 and $900.
Full main stack replacement is a bigger job because it usually involves multiple floors and more coordination with fixtures. Expect $2,500 to $7,500 for a typical residential stack. Under-slab replacement is the most expensive scenario by far, often running $3,000 to $20,000 or more, since it requires breaking concrete, excavating, running new pipe, and restoring the slab afterward.
What actually drives your quote up or down:
- Access: an exposed basement run costs far less to fix than a line buried under a finished floor
- Length: longer runs mean more material and more labor hours
- Demolition and restoration: cutting into drywall, flooring, or concrete adds cost on both ends of the job, tear-out and put-back
- Sewer-camera inspection: typically $250 to $1,600 depending on how much of the system needs to be scoped
- Permits and municipal fees: usually modest, but they add administrative time
- Landscaping or paving restoration: if the fix requires digging up a yard or driveway, add that cost separately
Trenchless CIPP lining runs on a cost-per-linear-foot basis that varies by region and pipe diameter, and it typically eliminates the excavation and restoration costs that make under-slab jobs so expensive.
Timeline scales the same way costs do. A single accessible sectional fix is often a same-day job. Full open replacement of a stack or a longer run can take multiple days once you factor in demolition, plumbing, inspection, and patching. Trenchless CIPP lining is usually a one-day install once the pipe has been cleaned and prepped, though prep work itself can take an extra day.
One thing worth knowing before you compare bids: some contractors underquote by leaving out restoration costs like landscaping repair or slab patching. Ask specifically whether a quote includes full restoration, not just the pipe work.
Permits, Inspections, and Disposal Rules You Shouldn't Skip
Most municipalities require a permit for drain replacement work that goes beyond a like-for-like repair, and fees typically run $50 to $500 depending on your local building department. On a hired job, the contractor usually pulls the permit as part of the scope. On a DIY job, that responsibility falls on you, so check with your local office before you cut into anything that touches the main line or affects the structure.
A sewer-camera inspection before you commit to a method tells you exactly where the damage sits and whether lining is even an option. It's worth doing this before repair, not just before full replacement, since it can reveal that a problem you thought was localized actually extends much further down the line.
Compliance and safety checklist:
- Confirm permit requirements with your local building department before starting any section removal
- Schedule a camera inspection before choosing a method, not after
- If your home predates 1980 and joints show fibrous packing material, stop and have it tested for asbestos before disturbing it; hire an abatement-qualified professional if it comes back positive
- Wear a respirator, goggles, and gloves any time you're cutting or handling old cast iron
- Dispose of removed cast iron through a scrap metal recycler or your municipal hazardous/bulk waste program, not standard curbside trash
A Working Plumber's Checklist for Vetting Contractors
Before you call anyone for a quote, take clear photos of the cleanout location, any visible corrosion or staining, and anything limiting access, like finished flooring or tight crawl spaces. Measure the approximate run length if you can. This turns a vague phone estimate into an accurate written quote and cuts down on scope creep once the work starts.
When you talk to a contractor, ask directly: is the permit included in the quote? Will you run a camera before and after the work? What's the warranty on materials and labor? Who handles cleanup and restoration, and is that itemized separately?
A reputable plumber will document the job with camera footage, guarantee the coupling work, and give you a written scope that matches what you photographed. Shortcuts to watch for including vague verbal estimates, no mention of a post-repair inspection, and quotes that seem too low against the ranges above. That gap is usually where restoration costs get quietly dropped.
A Recent Job: Diagnosing and Fixing a Failing Stack
A recent service call started with a homeowner reporting slow drains on two floors and a faint sewage smell near a basement cleanout. A camera inspection showed heavy scaling and one collapsed joint about eight feet into the main stack, not the isolated clog the homeowner expected.
Given the location and the extent of scaling, a sectional swap wasn't enough. The crew supported the stack with riser clamps, cut out the damaged section, and installed PVC with shielded couplings, maintaining proper slope through the transition. The whole repair took one day, and a follow-up camera check confirmed clean flow.
The lesson holds for most homeowners facing similar symptoms: what looks like a clog is often a structural issue. A camera inspection before you pick a method saves you from guessing.
— JOHN
Ready to Book a Cast Iron Drain Inspection or Replacement?
If you're weighing a DIY sectional fix against calling in a pro, Homeowners in the area can get a faster path to a clear answer: a camera inspection and an on-site quote from a licensed plumber who handles the permit paperwork for you.

When you call, expect an onsite evaluation of the affected line, a written quote that breaks out labor, materials, and any restoration work, and a realistic timeline before anyone starts cutting. The company handles everything from a single accessible sectional repair to full stack replacement and can talk through whether trenchless lining fits your situation. Service is available for both scheduled inspections and urgent calls when a backup can't wait. Start with a plumbing service request to get a licensed evaluation and a straight answer on repair versus replacement.
Sources
The cost ranges, coupling technique, and safety guidance in this article come from a small set of trusted references worth reading directly if you want more depth.
- Cost to Replace Cast Iron Pipes — Angi (cost breakdown and drivers)
- How to replace cast iron plumbing with PVC — Plumbing Tips Today
- Rapidrepair
- Forum and technical discussion: joining PVC to cast iron (practical torque and transition guidance) — TerryLove forums
FAQ
Should Cast Iron Drain Pipes Be Replaced?
Replacement is usually the right call once a pipe shows repeated backups, visible corrosion, or is past the 50-year mark, since patch repairs on heavily corroded cast iron tend to fail again soon after.
How Do I Replace a Cast Iron Floor Drain?
Shut off the water, support any connected stack with riser clamps, cut out the damaged section, and splice in Schedule 40 PVC using shielded transition couplings tightened to spec, maintaining a 1/4 inch per foot slope throughout.
Will Insurance Cover Cast Iron Pipe Replacement?
Coverage varies by policy and cause. Sudden pipe bursts are sometimes covered, but gradual corrosion or wear and tear typically isn't, so check your specific policy language or ask your insurer before assuming coverage applies.
How Do You Replace Old Cast Iron Drain Pipe?
For accessible sections, cut out the damaged run and connect new PVC with shielded couplings, as detailed in the step-by-step section above. For main stacks or under-slab lines, hire a licensed plumber, since those jobs involve structural risk and often require permits.