Leak detection is the structured process of confirming a leak exists, narrowing down the affected area, and pinpointing the exact location using specialized diagnostic tools. Professionals call this discipline "leak localization," and it goes far beyond simply noticing a wet spot on the wall. Methods like acoustic detection, thermal imaging, tracer gas injection, and pressure testing each play a distinct role. Understanding how leak detection works helps you protect your property, avoid unnecessary demolition, and make smarter decisions when repair costs are on the line.
What are the primary leak detection methods and how do they work?

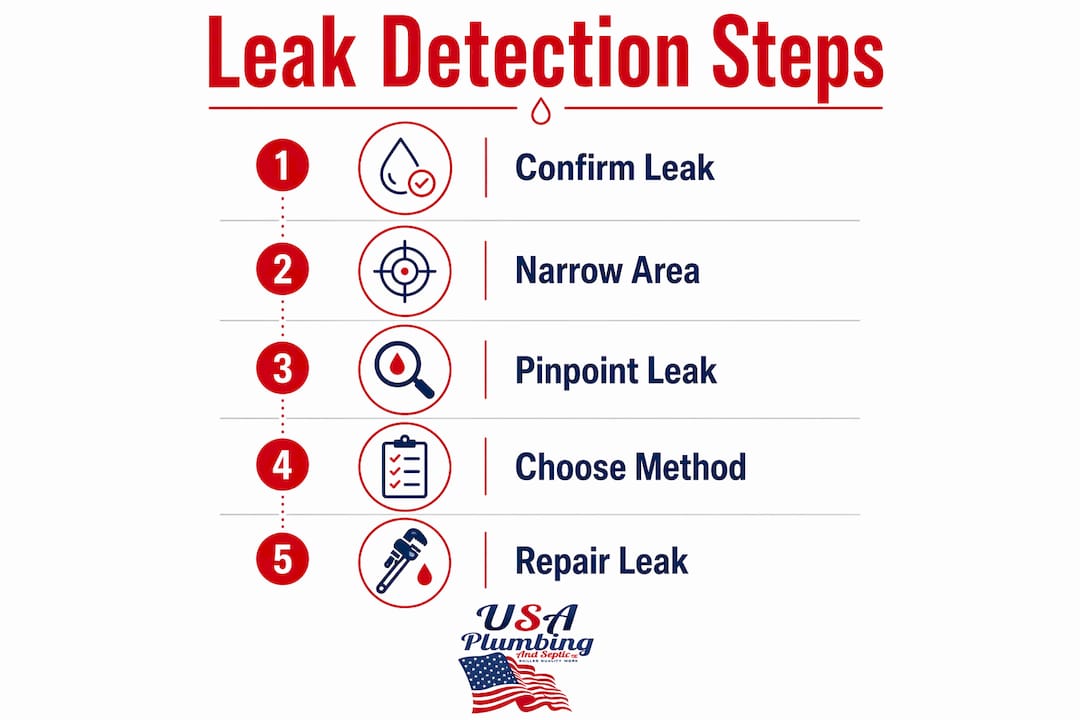
Leak detection is a structured diagnostic process that moves through four stages: confirm the leak exists, narrow the affected zone, pinpoint the exact location, and validate the repair. Each stage uses different tools. Skipping a stage is where most costly mistakes happen.
Here are the five core leak detection methods professionals use:
-
Pressure testing. A technician isolates a pipe section, pressurizes it, and watches for a pressure drop over time. A drop confirms a leak exists. Pressure testing does not tell you where the leak is. It is the starting point, not the finish line.
-
Acoustic detection. Sensitive microphones pick up the sound of pressurized water escaping through a crack or joint. Technicians move sensors along the pipe path and compare signal strength at multiple points to zero in on the source. The location with the strongest signal is the likely leak point.
-
Thermal imaging. An infrared camera scans walls, floors, and ceilings for temperature anomalies caused by moisture. Wet zones appear cooler or warmer depending on the water temperature. Thermal imaging is excellent for scanning large areas quickly, but it guides further investigation rather than pinpointing a leak on its own.
-
Tracer gas detection. A safe gas mixture, typically around 5% hydrogen, is injected into the pipe. The gas diffuses through tiny cracks and rises to the surface, where a sensor detects it. This method excels at finding leaks under concrete slabs or inside insulated walls where other tools struggle.
-
Moisture meters. These handheld devices measure moisture content in building materials. They confirm wet zones but do not pinpoint the leak source on their own. They work best as a secondary tool to validate what thermal imaging or acoustic detection has already flagged.
Pro Tip: Never skip the pressure test. Chasing acoustic signals without first confirming an active leak leads to false positives and wasted time.
How do professionals pinpoint leaks in hidden or hard-to-reach areas?
Concealed leaks, such as those under a concrete slab or inside an insulated wall cavity, require a structured approach. Professionals follow a four-step process to avoid tearing out materials unnecessarily.
-
Confirm the leak is active. A pressure test or water meter check establishes that water is escaping. Confirming leak activity before deploying acoustic tools prevents technicians from chasing non-leak noises like pipe expansion or nearby traffic vibration.
-
Narrow the affected area. Thermal imaging scans the surface to identify temperature anomalies. This step shrinks the search zone from an entire floor to a few square feet, saving time and reducing the risk of unnecessary damage.
-
Locate the leak precisely. For accessible pipes, acoustic correlators use multiple sensors to cross-correlate signal timing and estimate the leak position along the pipe. For under-slab or insulated leaks where acoustic methods are unreliable, tracer gas is injected and allowed roughly 30 minutes to diffuse before sensors scan the surface.
-
Validate before cutting. Once a location is identified, technicians recheck with a second method before any demolition begins. This step alone prevents the most common and expensive mistake in leak repair: opening the wrong section of wall or floor.
Pro Tip: Acoustic correlator accuracy depends on pipe material, sensor spacing, and alignment. Plastic pipes absorb sound differently than copper, so always tell your technician what your pipes are made of before the job starts.
Tracer gas is the method of choice when acoustic detection cannot work. Insulation absorbs sound waves, and concrete slabs block temperature signals. Hydrogen, being the lightest element, rises through even minute cracks in complex structures where no other method can reach.
Leak detection techniques compared: which method fits your situation?
Each method has a clear role. Choosing the wrong one wastes time and money. The table below shows where each technique performs best.
| Method | Best use case | Key limitation |
|---|---|---|
| Pressure testing | Confirming a leak exists in an isolated pipe section | Does not locate the leak |
| Acoustic detection | Locating leaks in metal pipes with good sound transmission | Less effective in plastic pipes or insulated areas |
| Thermal imaging | Scanning large surfaces quickly for moisture zones | Guides investigation; rarely pinpoints alone |
| Tracer gas | Locating leaks under slabs, in insulation, or complex structures | Requires gas injection equipment and diffusion time |
| Moisture meters | Confirming wet building materials after initial detection | Cannot identify the leak source on its own |
A layered approach combining multiple tools reduces false positives and prevents unnecessary property damage. Professionals rarely rely on a single method. A thermal scan identifies the zone, acoustic detection narrows the pipe section, and tracer gas confirms the exact point. That sequence protects your walls, floors, and budget.
Acoustic detection fails most often in two situations: pipes surrounded by insulation and plastic pipe systems. Sound absorption kills the signal before it reaches the sensor. In those cases, tracer gas outperforms acoustic methods because it does not depend on sound or temperature at all. It simply follows the path of least resistance through the crack.
Thermal imaging is most valuable as a first pass, not a final answer. It tells you where to look, not exactly what you will find. Treating a thermal scan as a definitive diagnosis leads to cutting into the wrong spot. Always follow it with a confirming method.
Practical tips for homeowners and property managers on detecting leaks early
Early detection is the difference between a minor repair and a major renovation. Most hidden leaks give you warning signs weeks before they cause serious damage.
- Watch your water meter. Turn off every water source in the building and check the meter. If it still moves, water is escaping somewhere. This is the fastest free confirmation test available to any homeowner.
- Check for unexplained bill increases. A sudden spike in your water bill without a change in usage is a reliable early warning sign of a hidden leak costing you money.
- Look for soft spots, staining, or mold. Discoloration on ceilings, soft drywall, or mold growth near baseboards all indicate moisture that has been present long enough to cause structural damage.
- Do not ignore small leaks. A slow drip under a sink or a faint damp smell in a crawl space signals a problem that will grow. Crawl space moisture in particular can damage floor joists and subfloor materials over months without any visible sign above.
- Call a professional when the source is not obvious. If you cannot identify the leak source within 15 minutes of looking, stop. Guessing leads to unnecessary demolition. A professional with acoustic or thermal equipment will find it faster and cheaper.
- Validate repairs after the fact. After any leak repair, a follow-up pressure test confirms the fix held. Skipping this step is how small leaks come back as bigger problems six months later.
Pro Tip: If your home has a concrete slab foundation, any unexplained wet spot on the floor deserves immediate professional attention. Slab leaks are among the most destructive and expensive plumbing failures a homeowner can face. You can review a plumbing emergency checklist to know exactly what steps to take before the technician arrives.
Maintaining your plumbing system reduces leak risk significantly. Annual inspections of visible pipe connections, water heater fittings, and shutoff valves catch deterioration before it becomes a failure. Protecting your plumbing proactively costs far less than emergency repairs after a leak has already spread.
Key takeaways
Effective leak detection combines pressure testing, acoustic detection, thermal imaging, and tracer gas in a structured sequence to confirm, locate, and validate leaks before any repair work begins.
| Point | Details |
|---|---|
| Confirm before you locate | Always use a pressure test or meter check to confirm an active leak before deploying acoustic tools. |
| Match the method to the situation | Tracer gas works best under slabs and in insulated areas where acoustic and thermal methods fail. |
| Layer your methods | Combining thermal imaging, acoustic detection, and tracer gas reduces false positives and protects your property. |
| Validate every repair | A follow-up pressure test after repair confirms the fix held and prevents repeat failures. |
| Act on early warning signs | Unexplained water bill increases and soft spots in walls are reliable signals that require professional evaluation. |
What I've learned from years of watching leak detection go wrong
The most expensive leak jobs I have seen share one common factor: someone skipped the confirmation step. A homeowner hears a dripping sound inside a wall, assumes the location, and cuts a hole in the wrong place. Now they have a damaged wall and still have a leak. The structured four-step process exists precisely to prevent that outcome.
Technology has genuinely changed what is possible. Thermal cameras and acoustic correlators have made it realistic to find a pinhole leak under a concrete slab without breaking the entire floor. Ten years ago, that job meant jackhammering a wide path and hoping for the best. Today, a skilled technician with the right equipment can often mark an X within inches of the actual leak point.
The mistake I see property managers make most often is treating leak detection as a one-time event. Plumbing systems degrade. Joints loosen. Pipe materials age differently depending on water chemistry and pressure cycles. Plumbing compliance in Arizona requires certain standards, but compliance alone does not prevent leaks. Scheduled inspections and meter monitoring should be part of every property maintenance calendar.
My honest recommendation: if you manage multiple units or a commercial property, invest in a baseline acoustic or thermal scan every two to three years. The cost is a fraction of what a single undetected slab leak or burst pipe will cost you in repairs, tenant displacement, and insurance claims.
— JOHN
Let Usaplumbingseptic find your leak fast

Usaplumbingseptic uses acoustic detection, thermal imaging, and tracer gas methods to locate leaks accurately without unnecessary demolition. We serve Bullhead City, Fort Mohave, Mohave Valley, Laughlin, and surrounding areas 24 hours a day, 7 days a week. Whether you have a suspected slab leak, a hidden pipe failure, or an unexplained water bill spike, our experienced team will confirm, locate, and repair the problem right the first time. Contact our professional plumbing team today for a reliable evaluation and affordable repair options you can count on.
FAQ
What is the most accurate leak detection method?
No single method is most accurate in every situation. Combining pressure testing, acoustic detection, and tracer gas delivers the highest accuracy because each method compensates for the weaknesses of the others.
How does tracer gas leak detection work?
A technician injects a safe hydrogen gas mixture into the pipe, then uses a surface sensor to detect gas escaping through cracks. The gas diffuses through minute openings and rises to the surface, making it effective for slab and insulated pipe leaks.
Can I detect a water leak myself?
You can confirm a leak exists by turning off all water sources and watching your meter for movement. Locating the exact source requires professional equipment like acoustic sensors or thermal cameras to avoid unnecessary property damage.
How long does professional leak detection take?
Most residential leak detection jobs take two to four hours depending on pipe access and the methods required. Slab leaks or complex commercial systems may require a full day when tracer gas diffusion time is factored in.
Why is leak detection important before starting repairs?
Skipping leak detection before repairs leads to opening walls or floors in the wrong location, which increases repair costs and causes additional property damage. Confirming the exact leak point first protects your budget and your building.